
Interactive SQL (often referred to in this manual as ISQL) is a utility supplied with c-treeSQL that lets you issue SQL statements directly from a terminal and see results displayed at the terminal. You can use interactive SQL to:
- Learn how SQL statements work
- Test and prototype SQL statements to be embedded in programs
- Modify an existing database with data definition statements
- Perform ad-hoc queries and generate formatted reports with special ISQL formatting statements
With few exceptions, any SQL statement that can be embedded in a program can be issued in interactive SQL, including CREATE, SELECT, and GRANT statements. Interactive SQL includes an online help facility with syntax and descriptions of the supported statements.
SQL Data Load Tips
ISQL is very useful for running interactive SQL statements. As an option, it allows creating and executing scripts to automate certain operations. These scripts can be used for running DDL statements (Data Definition Language: create table, create index, alter table, etc.) and DML statements (Data Manipulation Language: insert, update, etc.). DML statements can become quite large if they must insert or update every record in a large table. ISQL is not intended for massive data load operations which require a large number of Insert statements.
FairCom provides tools that are more appropriate for manipulating large numbers of records:
- dbload loads records from an input data file into tables of a database.
- dbdump writes the data in a database to a file.
Quick Tour
The tutorials in this chapter will introduce the basic use of FairCom DB ISQL, the Interactive SQL Interface.
Introductory Tutorial
<faircom>\drivers\sql.cli\tutorials\iSQL_Tutorial1.sql
This tutorial will take you through the basic use of the FairCom DB SQL ISQL - Interactive SQL Interface.
As with all other examples in the c-tree tutorial series, this tutorial simplifies the creation and use of a database into four simple steps: Initialize(), Define(), Manage(), and You’re Done() !
Tutorial #1: Introductory - Simple Single Table
We wanted to keep this program as simple as possible. This program does the following:
- Initialize() - Connects to the FairCom Database Engine.
- Define() - Defines and creates a "customer master" (custmast) table/file.
- Manage() - Adds a few rows/records; Reads the rows/records back from the database; displays the column/field content; and then deletes the rows/records.
- Done() - Disconnects from FairCom Database Engine.
Note these steps in our SQL script:
SET ECHO OFF

-- Initialize
ECHO INIT;

-- Define
ECHO DEFINE;

-- Manage
ECHO MANAGE;

-- Done
ECHO DONE;
We suggest opening the source code with your own editor.
Continue now to review these four steps.
Init

First we need to open a connection to a database by providing the FairCom Database Engine with a user name, password and the database name.
Below is the code for Initialize():
SET ECHO OFF

-- Initialize
ECHO INIT;

SET AUTOCOMMIT ON;
Define

Define() establishes specific data definitions. This involves defining columns/fields and creating the tables/files with optional indexes.
Below is the code for Define():
-- Define
ECHO DEFINE;

ECHO Create table...;
CREATE TABLE custmast (
   cm_custnumb CHAR(4),
   cm_custzipc CHAR(9),
   cm_custstat CHAR(2),
   cm_custrtng CHAR(1),
   cm_custname VARCHAR(47),
   cm_custaddr VARCHAR(47),
   cm_custcity VARCHAR(47));
Manage

Manage() provides data management functionality for your application and/or process.
Below is the code for Manage():
-- Manage
ECHO MANAGE;

ECHO Delete records...;
DELETE FROM custmast;

ECHO Add records...;
INSERT INTO custmast VALUES ('1000', '92867', 'CA', '1', 'Bryan Williams', '2999 Regency', 'Orange');
INSERT INTO custmast VALUES ('1001', '61434', 'CT', '1', 'Michael Jordan', '13 Main', 'Harford');
INSERT INTO custmast VALUES ('1002', '73677', 'GA', '1', 'Joshua Brown', '4356 Cambridge', 'Atlanta');
INSERT INTO custmast VALUES ('1003', '10034', 'MO', '1', 'Keyon Dooling', '19771 Park Avenue', 'Columbia');

ECHO Display records...;
SELECT cm_custnumb "Number", cm_custname "Name" FROM custmast;

ECHO Delete records...;
DELETE FROM custmast;
Done

When an application and/or process has completed operations with the database, it must release resources by closing the open files and disconnecting from the database engine.
Below is the code for Done():
-- Done
ECHO DONE;
Additional Resources
![]()
We encourage you to explore the additional resources listed here:
- Complete source code for this tutorial can be found in iSQL_Tutorial1.sql in your installation directory, within the <faircom>\drivers\sql.cli\tutorials directory for your platform.
Relationships
<faircom>\drivers\sql.cli\tutorials\iSQL_Tutorial2.sql
Now we will build some table/file relationships using the FairCom DB SQL ISQL - Interactive SQL Interface.
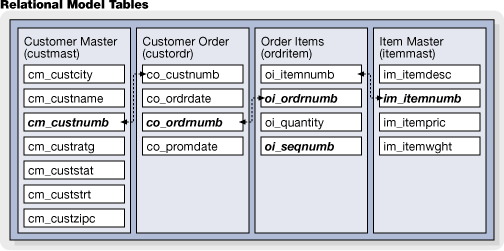
This tutorial will advance the concepts introduced in the first tutorial by expanding the number of tables. We will define key columns/fields and create specific indexes for each table to form a relational model database.
Like all other examples in the c-tree tutorial series, this tutorial simplifies the creation and use of a database into four simple steps: Initialize(), Define(), Manage(), and You’re Done() !
Tutorial #2: Relational Model and Indexing
Here we add a bit more complexity, introducing multiple tables, with related indices in order to form a simple "relational" database simulating an Order Entry system. Here is an overview of what will be created:
- Initialize() - Connects to the FairCom Database Engine.
- Define() - Defines and creates the "custmast", "custordr", "ordritem" and the "itemmast" tables/files with related indexes.
- Manage() - Adds some related rows/records to all tables/files. Then queries the database.
- Done() - Disconnects from FairCom Database Engine.
Note these steps in our SQL script:
SET ECHO OFF

-- Initialize
ECHO INIT;

-- Define
ECHO DEFINE;

-- Manage
ECHO MANAGE;

-- Done
ECHO DONE;
We suggest opening the source code with your own editor.
Continue now to review these four steps.
Init
First we need to open a connection to a database by providing the FairCom Database Engine with a user name, password and the database name.
Below is the code for Initialize():
SET ECHO OFF

-- Initialize
ECHO INIT;

SET AUTOCOMMIT ON;
Define
Define() establishes specific data definitions. This involves defining columns/fields and creating the tables/files with optional indexes.
Below is the code for Define():
-- Define
ECHO DEFINE;

ECHO Drop custmast table from Tutorial 1
DROP TABLE custmast;

ECHO table CustomerMaster...;
CREATE TABLE custmast (
   cm_custnumb CHAR(4),
   cm_custzipc CHAR(9),
   cm_custstat CHAR(2),
   cm_custrtng CHAR(1),
   cm_custname VARCHAR(47),
   cm_custaddr VARCHAR(47),
   cm_custcity VARCHAR(47));
CREATE UNIQUE INDEX cm_custnumb_idx ON custmast (cm_custnumb);

ECHO table CustomerOrders...;
CREATE TABLE custordr (
   co_ordrdate DATE,
   co_promdate DATE,
   co_ordrnumb CHAR(6),
   co_custnumb CHAR(4));
CREATE UNIQUE INDEX co_ordrnumb_idx ON custordr (co_ordrnumb);
CREATE INDEX co_custnumb_idx ON custordr (co_custnumb);

ECHO table OrderItems...;
CREATE TABLE ordritem (
   oi_sequnumb SMALLINT,
   oi_quantity SMALLINT,
   oi_ordrnumb CHAR(6),
   oi_itemnumb CHAR(5)
);
CREATE UNIQUE INDEX oi_ordrnumb_idx ON ordritem (oi_ordrnumb, oi_sequnumb);
CREATE INDEX oi_itemnumb_idx ON ordritem (oi_itemnumb);

ECHO table ItemMaster...;
CREATE TABLE itemmast (
   im_itemwght INTEGER,
   im_itempric MONEY,
   im_itemnumb CHAR(5),
   im_itemdesc VARCHAR(47)
);
CREATE UNIQUE INDEX im_itemnumb_idx ON itemmast (im_itemnumb);
Manage
Manage() provides data management functionality for your application and/or process.
Below is the code for Manage():
-- Manage
ECHO MANAGE;

ECHO Delete records...;
DELETE FROM custmast;
DELETE FROM custordr;
DELETE FROM ordritem;
DELETE FROM itemmast;

ECHO Add records...;
INSERT INTO custmast VALUES ('1000', '92867', 'CA', '1', 'Bryan Williams', '2999 Regency', 'Orange');
INSERT INTO custmast VALUES ('1001', '61434', 'CT', '1', 'Michael Jordan', '13 Main', 'Harford');
INSERT INTO custmast VALUES ('1002', '73677', 'GA', '1', 'Joshua Brown', '4356 Cambridge', 'Atlanta');
INSERT INTO custmast VALUES ('1003', '10034', 'MO', '1', 'Keyon Dooling', '19771 Park Avenue', 'Columbia');

INSERT INTO custordr VALUES ('09/01/2002', '09/05/2002', '1', '1001');
INSERT INTO custordr VALUES ('09/02/2002', '09/06/2002', '2', '1002');

INSERT INTO ordritem VALUES (1, 2, '1', '1');
INSERT INTO ordritem VALUES (2, 1, '1', '2');
INSERT INTO ordritem VALUES (3, 1, '1', '3');
INSERT INTO ordritem VALUES (1, 3, '2', '3');

INSERT INTO itemmast VALUES (10, 19.95,  '1', 'Hammer');
INSERT INTO itemmast VALUES (3,   9.99,  '2', 'Wrench');
INSERT INTO itemmast VALUES (4,  16.59,  '3', 'Saw');
INSERT INTO itemmast VALUES (1,   3.98,  '4', 'Pliers');

ECHO;
ECHO Query results;

SELECT cm_custname "Name", SUM(im_itempric * oi_quantity) "Total"
   FROM custmast, custordr, ordritem, itemmast
   WHERE co_custnumb = cm_custnumb AND co_ordrnumb = oi_ordrnumb AND oi_itemnumb = im_itemnumb
   GROUP BY cm_custnumb, cm_custname;
Done
When an application and/or process has completed operations with the database, it must release resources by closing the open files and disconnecting from the database engine.
Below is the code for Done():
-- Done
ECHO DONE;
Additional Resources
![]()
We encourage you to explore the additional resources listed here:
- Complete source code for this tutorial can be found in iSQL_Tutorial2.sql in your installation directory, within the <faircom>\drivers\sql.cli\tutorials directory for your platform.
Record/Row Locking
<faircom>\drivers\sql.cli\tutorials\iSQL_Tutorial3.sql
Now we will explore row/record locks using the FairCom DB SQL ISQL - Interactive SQL Interface.
The functionality for this tutorial focuses on inserting/adding rows/records, then updating a single row/record in the customer master table under locking control. The application will pause after a LOCK is placed on a row/record. Another instance of this application should then be launched, which will block, waiting on the lock held by the first instance. Pressing the <Enter> key will enable the first instance to proceed. This will result in removing the lock thereby allowing the second instance to continue execution. Launching two processes provides a visual demonstration of the effects of locking and a basis for experimentation on your own.
As with all other examples in the c-tree tutorial series, this tutorial simplifies the creation and use of a database into four simple steps: Initialize(), Define(), Manage(), and you’re Done() !
Tutorial #3: Locking
Here we demonstrate the enforcement of data integrity by introducing record/row "locking".
- Initialize() - Connects to the FairCom Database Engine.
- Define() - Defines and creates a "customer master" (custmast) table/file.
- Manage() - Adds a few rows/records, manipulates them, and displays the results.
- Done() - Disconnects from FairCom Database Engine.
Note these steps in our SQL script:
SET ECHO OFF

-- Initialize
ECHO INIT;

-- Define
ECHO DEFINE;

-- Manage
ECHO MANAGE;

-- Done
ECHO DONE;
We suggest opening the source code with your own editor.
Continue now to review these four steps.
Init
First we need to open a connection to a database by providing the FairCom Database Engine with a user name, password and the database name.
Below is the code for Initialize():
SET ECHO OFF

-- Initialize
ECHO INIT;

SET AUTOCOMMIT OFF;
Define
Define() establishes specific data definitions. This involves defining columns/fields and creating the tables/files with optional indexes.
Below is the code for Define():
-- Define
ECHO DEFINE;

ECHO Create table...;
CREATE TABLE custmast (
   cm_custnumb CHAR(4),
   cm_custzipc CHAR(9),
   cm_custstat CHAR(2),
   cm_custrtng CHAR(1),
   cm_custname VARCHAR(47),
   cm_custaddr VARCHAR(47),
   cm_custcity VARCHAR(47));
CREATE UNIQUE INDEX cm_custnumb_idx ON custmast (cm_custnumb);
COMMIT WORK;
Manage
Manage() provides data management functionality for your application and/or process.
Below is the code for Manage():
-- Manage
ECHO MANAGE;

ECHO Delete records...;
DELETE FROM custmast;

ECHO Add records...;
INSERT INTO custmast VALUES ('1000', '92867', 'CA', '1', 'Bryan Williams', '2999 Regency', 'Orange');
INSERT INTO custmast VALUES ('1001', '61434', 'CT', '1', 'Michael Jordan', '13 Main', 'Harford');
INSERT INTO custmast VALUES ('1002', '73677', 'GA', '1', 'Joshua Brown', '4356 Cambridge', 'Atlanta');
INSERT INTO custmast VALUES ('1003', '10034', 'MO', '1', 'Keyon Dooling', '19771 Park Avenue', 'Columbia');
COMMIT WORK;

UPDATE custmast SET cm_custname = 'KEYON DOOLING' WHERE cm_custnumb = '1003';
ECHO Issue a COMMIT WORK to commit changes and release locks
Done
When an application and/or process has completed operations with the database, it must release resources by closing the open files and disconnecting from the database engine.
Below is the code for Done():
-- Done
ECHO DONE;
Additional Resources
![]()
We encourage you to explore the additional resources listed here:
- Complete source code for this tutorial can be found in iSQL_Tutorial3.sql in your installation directory, within the <faircom>\drivers\sql.cli\tutorials directory for your platform.
Transaction Processing
<faircom>\drivers\sql.cli\tutorials\iSQL_Tutorial4.sql
Now we will discuss transaction processing as it relates to the FairCom DB SQL ISQL - Interactive SQL Interface.
Transaction processing provides a safe method by which multiple database operations spread across separate tables/files are guaranteed to be atomic. By atomic, we mean that, within a transaction, either all of the operations succeed or none of the operations succeed. This "either all or none" atomicity ensures that the integrity of the data in related tables/files is secure.
Like all other examples in the c-tree tutorial series, this tutorial simplifies the creation and use of a database into four simple steps: Initialize(), Define(), Manage(), and You’re Done()!
Tutorial #4: Transaction Processing
Here we demonstrate transaction control.
- Initialize() - Connects to the FairCom Database Engine.
- Define() - Defines and creates our four tables/files.
- Manage() - Adds rows/records to multiple tables/files under transaction control.
- Done() - Disconnects from FairCom Database Engine.
Note these steps in our SQL script:
SET ECHO OFF

-- Initialize
ECHO INIT;

-- Define
ECHO DEFINE;

-- Manage
ECHO MANAGE;

-- Done
ECHO DONE;
We suggest opening the source code with your own editor.
Continue now to review these four steps.
Init
First we need to open a connection to a database by providing the FairCom Database Engine with a user name, password and the database name.
Below is the code for Initialize():
SET ECHO OFF

-- Initialize
ECHO INIT;

SET AUTOCOMMIT OFF;
Define
Define() establishes specific data definitions. This involves defining columns/fields and creating the tables/files with optional indexes.
Below is the code for Define():
/*
 * Define()
 *
 * Create the table for containing a list of existing customers
 */
Manage
Manage() provides data management functionality for your application and/or process.
Below is the code for Manage():
/*
 * Manage()
 *
 * This function performs simple record functions of add, delete and gets
 */
Done
When an application and/or process has completed operations with the database, it must release resources by closing the open files and disconnecting from the database engine.
Below is the code for Done():
/*
 * Done()
 *
 * This function handles the housekeeping of closing connection and
 * freeing of associated memory
 */
Additional Resources
![]()
We encourage you to explore the additional resources listed here:
- Complete source code for this tutorial can be found in iSQL_Tutorial4.sql in your installation directory, within the <faircom>\drivers\sql.cli\tutorials directory for your platform.